
Are you ready to learn how to harvest vermicompost and obtain nutrient-rich organic fertilizer without harming your worms? In this guide, we will explore different methods to help you collect worm castings while preserving the health of your worm population.
Vermicompost, also known as worm castings, is a valuable resource created through the composting of organic materials with the help of worms. Harvesting vermicompost is crucial for maintaining a healthy worm population and obtaining the nutrient-rich fertilizer that your plants crave.
It’s important to ensure the well-being of your worms throughout the harvesting process. By following the techniques and tips provided in this article, you can confidently collect worm-free vermicompost for your gardening needs.
Key Takeaways:
- Harvesting vermicompost is essential for maintaining a healthy worm population and obtaining nutrient-rich organic fertilizer.
- Methods such as encouraging worm relocation, using light to prompt worm movement, hand harvesting, and screen composting can help you collect worm-free castings.
- Proper storage of vermicompost is crucial in preserving its quality and effectiveness.
- Worm castings have a relatively long shelf life but are most potent when used fresh. Their effectiveness gradually decreases over time.
- Regularly monitoring your worm bin and adjusting the harvest frequency will ensure a continuous supply of vermicompost.
What Are Worm Castings?
Worm castings, also known as vermicompost or worm humus, are the waste product produced by worms as they digest organic matter. These castings are highly valued for their nutrient-rich composition, containing essential elements like nitrogen, phosphorus, and potassium. They also contain beneficial microorganisms that enhance soil health and prevent plant diseases. Worm castings can be used as a soil amendment, top dressing for plants, or component of potting soil, serving as a superior alternative to chemical fertilizers.
“Worm castings, also known as vermicompost or worm humus, are the waste product produced by worms as they digest organic matter.”
Worm castings have a crumbly texture and a dark, earthy appearance. They are odorless and easy to handle, making them a convenient and user-friendly organic fertilizer option. The slow-release nature of worm castings ensures a continuous and balanced nutrient supply to plants, promoting healthy growth and vibrant blooms. Additionally, the microorganisms present in worm castings help break down organic matter, improving soil structure and fertility.
Benefits of Worm Castings:
- Rich in essential nutrients
- Contains beneficial microorganisms
- Promotes healthy plant growth
- Improves soil structure and fertility
- Environmentally friendly alternative to chemical fertilizers
Composition of Worm Castings:
| Nutrient | Percentage |
|---|---|
| Nitrogen | 1.5% |
| Phosphorus | 0.7% |
| Potassium | 0.4% |
| Calcium | 5.0% |
| Magnesium | 0.5% |
As you can see, worm castings are a valuable source of essential nutrients for plants. Their organic composition and beneficial microorganisms make them an excellent choice for both indoor and outdoor gardening.
Method One: Encourage Worm Relocation
To harvest vermicompost without harming the worms, one effective method is to encourage worm relocation. This method works well for both single tray systems and multi-tray vermicomposting systems.
In a single tray system:
- Gather any uncomposted scraps and move them to one side or the center of the tray.
- Add fresh food only in the spot where you want the worms to migrate.
In a multi-tray system:
- Put food in the tray above the one you want to harvest.
- The worms will naturally migrate towards the food source, leaving behind nearly worm-free castings to harvest.
This method is ideal for those who are uncomfortable touching worms and provides a practical way to obtain worm-free vermicompost.
| Advantages | Disadvantages |
|---|---|
| – Worms relocate on their own | – May take some time for worms to fully relocate |
| – Minimal handling of worms | – Requires careful placement of food to guide worm movement |
| – Worm castings are easy to collect |
Expert Tip:
For multi-tray systems, make sure to keep track of the tray you want to harvest by using labels or marking the trays. This will prevent any confusion and ensure you harvest the desired tray.

By following this method, you can successfully harvest worm castings while keeping your worms safe and maintaining a healthy vermicomposting system.
Method Two: Relocation by Light
Another effective method for harvesting worm castings is through the use of light. Worms are sensitive to light and will naturally move away from any light source. This behavior can be harnessed to separate the worms from the castings.

There are two techniques you can try using the light method. The first technique involves gently dumping out the worm tray onto a clean surface and creating mounds of castings. The worms will burrow down to the bottom to escape the light, allowing you to scrape off the top layers of castings. This method is efficient for larger-scale vermicomposting operations.
“The light method is a simple and effective way to ensure the castings remain worm-free, and it reduces the need for manual sorting.” – VermiWiz
Alternatively, you can transfer the worm castings into a temporary holding container, add more food and bedding to the empty tray, and cover it with material that has worm-sized holes. After a short period, the worms will burrow into the tray, leaving you with worm-free castings. This technique is ideal for those who prefer a more controlled and targeted approach.
H3: Sunlight vs Artificial Light
When using the light method, it’s essential to consider the source of light. Exposing the worms to excessive sunlight or heat can harm them. If harvesting outdoors, it’s best to choose a shaded area or work during the cooler parts of the day. Alternatively, you can utilize artificial light sources such as LED grow lights or fluorescent bulbs. These light sources can be adjusted to provide the necessary intensity without causing harm to the worms.
Using the light method not only ensures worm-free vermicompost but also reduces the need for manual sorting and handling of the worms. By understanding how worms react to light, you can effectively harness this behavior to obtain high-quality castings for your gardening needs.
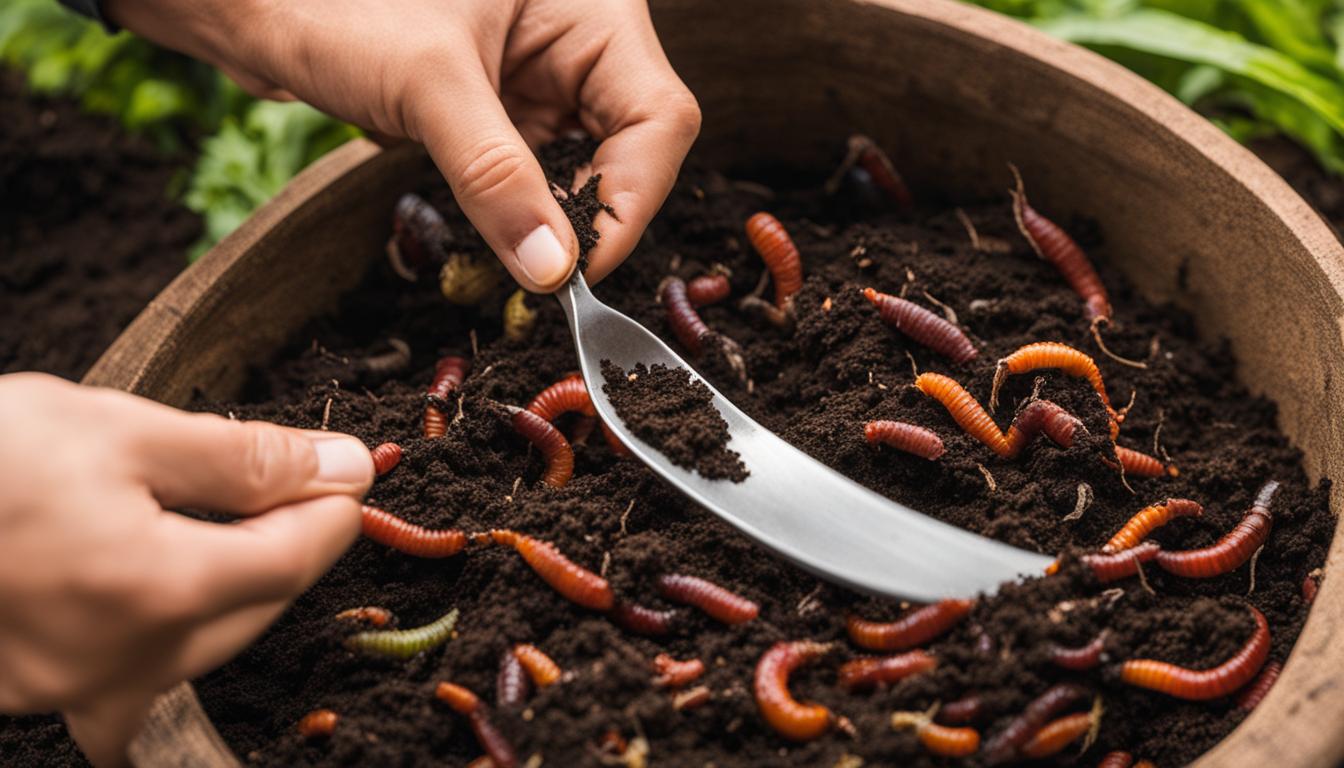
Method Three: Hand Harvest
If you prefer a more hands-on approach to harvesting your vermicompost, hand harvesting is a suitable method to consider. This method involves manually gathering handfuls of worm castings and sifting through them to separate the worms. Hand harvest allows you to remove the worms and return them to the compost bin while collecting the nutrient-rich castings for your gardening needs.
To hand harvest vermicompost, you can either dump out the entire tray and sort through it or choose smaller handfuls for a more targeted harvest. By sorting through the castings, you can ensure that you are collecting the finished compost while keeping the worms separate. This method is especially useful for small-scale harvests or for those who prefer a more involved and tactile process.
Hand Harvesting Steps:
- Gather a handful of vermicompost from the tray.
- Slowly sift through the castings, separating any worms from the compost.
- Return the worms to the tray or compost bin.
- Collect the worm-free castings for use in your garden.
Remember to handle the worms and castings with care to avoid damaging them. Hand harvesting is an effective method for obtaining worm-free vermicompost while allowing you to closely interact with your composting worms.

Method Four: Screen Compost
When it comes to harvesting worm castings, the screen compost method is a highly effective technique for separating worms, undigested material, and other debris from the finished compost. By sifting the worm bedding through a screen, you can obtain a clean and refined vermicompost that is ready for use.
To implement the screen compost method, you can either purchase a composting screen or make one yourself. The screen should have small enough openings to allow the fine castings to pass through while keeping the worms and larger particles on top.
Here is how you can use the screen compost method:
- Prepare your composting screen by placing it over a container or tarp to catch the sifted compost.
- Take a handful or scoop of worm castings and gently rub them against the screen, allowing the fine particles to fall through.
- As you sift the castings, you will notice that worms, undigested material, and other debris will remain on top of the screen.
- Separate the worms and return them to your worm bin or composting system.
- Continue sifting the castings until you have separated all the worms and obtained a pile of clean and refined vermicompost.
The screen compost method provides you with high-quality worm castings that are free from unwanted materials, ensuring optimal results when applied to your plants and garden.

How to Store Worm Castings
After harvesting your worm castings, it’s important to store them properly until you are ready to use them. By following a few simple steps, you can ensure that your worm castings remain fresh and nutrient-rich for an extended period of time.
Airtight Storage Container
First and foremost, choose a suitable storage container that is airtight and moisture-proof. This will help prevent any moisture or oxygen from entering the container, which can degrade the quality of the worm castings over time. A sealed container will also keep out any pests or insects that may be attracted to the organic matter in the castings.
It’s recommended to use a sack, clean bucket, or plastic container with a tight-fitting lid. Make sure the container is clean and dry before transferring the worm castings into it.
Keep in a Cool and Dark Place
Store the container in a cool and dark place, away from direct sunlight or heat sources. Excessive heat can dry out the castings, while sunlight can promote the growth of algae or other unwanted microorganisms. A temperature range of 40-70°F (4-21°C) is ideal for maintaining the quality of the worm castings.
Check for Moisture Regularly
Periodically check the moisture level in the container. If the castings feel too dry, you can lightly mist them with water to restore the moisture. On the other hand, if the castings become overly damp, you may need to leave the container open for a short period to allow excess moisture to evaporate.
By following these storage guidelines, you can ensure that your worm castings remain fresh and potent, ready to be used whenever you need them for your garden or potted plants.
How Long Do Worm Castings Last?
When it comes to the lifespan of worm castings, proper storage and usage play a crucial role in maintaining their effectiveness and freshness. While worm castings can be stored for up to a year, it’s important to note that their potency gradually decreases over time. Freshly harvested worm castings contain a high concentration of beneficial microorganisms that enhance soil health and plant growth. As time passes, these microorganisms start to die off, reducing the effectiveness of the castings.
To maximize the benefits of worm castings, it’s recommended to use them as soon as possible after harvesting. However, if you need to store them, ensure they are stored in a dry and cool place to maintain their quality. Using an airtight container is essential to prevent moisture and oxygen from degrading the castings. Additionally, avoid exposing the castings to direct sunlight or excessive heat, as it can also impact their freshness and effectiveness.
By following proper storage practices, you can prolong the shelf life of worm castings and ensure they retain their nutritional value for a longer period. Regularly monitor the quality of your stored castings and prioritize using them in a timely manner to fully benefit from their rich composition.
How Often Should You Harvest Worm Castings?
Harvesting frequency plays a crucial role in maintaining a healthy worm population and ensuring a continuous supply of nutrient-rich vermicompost for your garden. The frequency of worm castings harvest is influenced by various factors, including the size of your worm bin, the amount of organic matter you add, and the rate of compost accumulation.
If you have a larger worm bin with a higher capacity, you can typically harvest worm castings every three to six months. This timeframe allows sufficient time for the worms to process the incoming organic matter and produce a significant amount of castings. However, if you have a smaller worm bin or a limited amount of organic matter, it may be necessary to extend the harvest interval to allow the worms to accumulate a substantial quantity of vermicompost.
To determine if it’s time to harvest, check the bottom of your worm bin for a layer of dark, crumbly compost. This is a clear indication that the castings have accumulated and are ready for harvest. By regularly monitoring your worm bin and adjusting the harvest frequency based on the compost accumulation, you can strike a balance between maintaining a thriving worm population and obtaining a steady supply of vermicompost for your garden.
Factors Affecting Harvesting Frequency:
- Worm bin size: Larger bins can typically be harvested more frequently.
- Organic matter input: A higher amount of food waste will speed up the production of worm castings.
- Compost accumulation: Waiting until a substantial layer of compost has formed ensures a more efficient harvest.
By considering these factors and adjusting your harvesting frequency accordingly, you can optimize the vermicomposting process and enjoy the benefits of nutrient-rich worm castings in your garden.
“Regularly monitoring your worm bin and adjusting the harvest frequency based on the compost accumulation will ensure a continuous supply of vermicompost for your garden.”
| Factors | Harvesting Frequency |
|---|---|
| Large worm bin | Every 3 to 6 months |
| Small worm bin | Varies based on compost accumulation |
| High organic matter input | More frequent harvests may be necessary |
| Low organic matter input | Less frequent harvests may be suitable |
Ensuring Worm-Free Vermicompost
While harvesting vermicompost, it’s common for some worms or their eggs to remain in the material. However, there are techniques you can use to minimize their presence and ensure worm-free vermicompost for your plants. Removing worms and eggs from the castings is crucial to prevent any unexpected appearances in your living space.
One method to remove worms from the castings is through hand sorting. By gently sifting through the castings, you can manually remove any remaining worms and return them to the worm bin. This process allows you to collect worm-free vermicompost for your plants.
To address any remaining eggs, some vermicomposting enthusiasts suggest using polenta. Sprinkle polenta on the surface of the vermicompost, and the worms will be attracted to it. This makes it easier to remove them before harvesting the castings. Another potential solution is freezing the vermicompost. Freezing can kill any remaining eggs, but it’s important to note that this method may affect the overall quality of the vermicompost and should be done cautiously.
By taking these precautions, you can ensure that your vermicompost is free of worms and eggs, providing you with high-quality organic fertilizer for your plants.
| Method | Description |
|---|---|
| Hand Sorting | Gently sift through the castings, manually remove worms, and return them to the worm bin. |
| Using Polenta | Sprinkle polenta on the vermicompost surface to attract worms, making it easier to remove them. |
| Freezing Vermicompost | Freeze the vermicompost to kill any remaining eggs, but be cautious as this may affect the overall quality. |

Quote:
“By taking these precautions, you can ensure that your vermicompost is free of worms and eggs, providing you with high-quality organic fertilizer for your plants.”
Conclusion
In conclusion, harvesting vermicompost without harming worms is a crucial step in obtaining this valuable organic fertilizer. Throughout this guide, we have explored various vermicompost harvesting techniques that allow you to collect worm castings while preserving the health of your worm population.
Whether you choose to encourage worm relocation, rely on light methods, hand harvest, or screen compost, each technique offers a unique approach to obtaining worm-free vermicompost for your gardening needs. By implementing these methods, you can successfully separate the nutrient-rich worm castings from the worms, allowing you to reap the benefits of vermicompost in your garden.
Remember to store your worm castings properly in airtight, moisture-proof containers to maintain their freshness and effectiveness. Regularly monitor your worm bin and adjust the harvest frequency based on the accumulation of castings. By doing so, you can ensure a continuous supply of vermicompost for your plants and promote a healthy ecosystem within your composting system.
So, get ready to embark on your vermicomposting journey and start harvesting your own worm castings. With these techniques at your disposal, you can enjoy the abundant benefits of vermicompost in a sustainable and eco-friendly manner. Happy vermicomposting!
FAQ
What are worm castings?
Worm castings, also known as vermicompost or worm humus, are the waste product produced by worms as they digest organic matter. They are nutrient-rich and contain essential elements like nitrogen, phosphorus, and potassium. They also contain beneficial microorganisms that enhance soil health and prevent plant diseases.
How can I encourage worm relocation during the harvest?
One method is to gather any uncomposted scraps in a single tray system and move them to one side or the center of the tray. Add fresh food only where you want the worms to migrate. In a multi-tray system, put food in the tray above the one you want to harvest. The worms will naturally migrate towards the food source, leaving behind nearly worm-free castings to harvest.
How can I relocate worms using light?
You can dump out the worm tray onto a clean surface and create mounds of castings. The worms will burrow down to the bottom to escape the light, allowing you to scrape off the top layers of castings. Alternatively, you can transfer the castings into a temporary holding container, add more food and bedding to the empty tray, and cover it with material that has worm-sized holes. After a short period, the worms will burrow into the tray, leaving behind worm-free castings.
How can I hand harvest worm castings?
Hand harvesting involves gathering handfuls of castings and sifting through them for worms. You can dump out the entire tray or choose smaller handfuls for a more targeted harvest. Manual sorting allows you to remove worms and return them to the tray while collecting the worm castings.
How can I separate worms from the castings?
Sifting the worm bedding through a screen is an effective way to separate worms, sticks, and undigested material from the finished compost. You can purchase or make a composting screen to sift the castings and separate the worms.
How should I store worm castings?
Worm castings should be stored in a sack, clean bucket, or another container that is airtight and moisture-proof. This will preserve their quality and ensure they remain ready for application to your garden or plants.
How long do worm castings last?
Worm castings can be stored for up to a year if kept in a dry and cool place. However, their effectiveness gradually decreases over time. Fresh worm castings are most potent, containing a high concentration of beneficial microorganisms. To maximize their benefits, it’s best to use worm castings as soon as possible after harvesting.
How often should I harvest worm castings?
The frequency of harvesting depends on various factors, but as a general guideline, you can harvest worm castings every three to six months. Check the bottom of your compost bin for a layer of dark, crumbly compost to determine if it’s time to harvest.
How can I ensure worm-free vermicompost?
Techniques such as encouraging worm relocation and hand sorting can help remove worms from the castings. To address the concern of remaining eggs, some suggest using polenta to lure worms towards the surface before harvesting. Freezing the vermicompost may also kill any remaining eggs, but it should be done cautiously as it can affect the overall quality of the compost.
What are the key takeaways from this guide?
This guide provides various methods for harvesting vermicompost without harming worms, including encouraging worm relocation, using light to move worms, hand harvesting, and screen composting. Proper storage of worm castings and timely use are essential for optimal results. Regular monitoring of your worm bin and adjusting the harvest frequency accordingly will ensure a continuous supply of vermicompost for your garden.


