
Garden tools are essential for maintaining a beautiful and thriving garden. However, if not properly stored, they can succumb to rust and deteriorate over time. To ensure the longevity of your garden tools and prevent rust from forming, it is crucial to follow these best practices for storing them.
Proper storage and maintenance of garden tools can save you money in the long run by avoiding the need for frequent replacements. By taking a few simple steps, you can keep your tools in excellent condition and ready for use whenever you need them.
Key Takeaways:
- Clean and dry your garden tools after each use to prevent rust.
- Remove rust from garden tools using appropriate rust removal products.
- Sand down wooden handles to prevent splinters and ensure a comfortable grip.
- Sharpen blades regularly for optimal cutting performance.
- Season both wooden and metal parts with oil to prevent rust and cracking.
Clean and Dry Your Garden Tools
Properly cleaning and drying your garden tools after each use is essential to prevent rust and maintain their longevity. Dirt, sap, and other debris can accumulate on the tools, leading to corrosion if left uncleaned. Follow these steps to ensure your garden tools stay clean and rust-free:
- Remove dirt and debris: Use a brush or a damp cloth to remove any dirt, mud, or grass clippings from the tools. Pay special attention to hard-to-reach areas such as crevices and joints.
- Remove sap and sticky residue: If there is sap or sticky residue on the tools, rub them with a cloth soaked in rubbing alcohol or vinegar. This will help dissolve the sap and make it easier to clean.
- Wash with mild soap and water: Fill a bucket or basin with warm water and a mild dish soap. Submerge the tools in the soapy water and scrub them with a sponge or brush. Rinse thoroughly with clean water to remove any soap residue.
- Dry thoroughly: After washing, use a clean towel to dry the tools thoroughly. Make sure to dry all the nooks and crannies where water might have accumulated. Leaving the tools wet can promote rust formation.
By regularly cleaning and drying your garden tools, you can prevent rust and keep them in optimal condition for years to come.
| Garden Tool | Cleaning Method |
|---|---|
| Shovels and Spades | Scrub with a brush and mild soap |
| Pruners and Shears | Wipe with rubbing alcohol or vinegar |
| Rakes and Hoes | Remove debris and wash with soapy water |
| Trowels and Hand Forks | Scrub with a sponge and mild dish soap |
Remember, clean and dry garden tools are less likely to develop rust and will perform optimally when used in the garden. Incorporating regular cleaning into your gardening routine will help protect your investment and ensure you have reliable tools to assist you in your gardening adventures.
Remove Rust from Garden Tools
Even with proper care, garden tools can develop rust over time. Rust can not only make your tools less effective but also shorten their lifespan. To prevent corrosion and keep your tools in top shape, it’s important to know how to effectively remove rust.

One effective way to remove rust from garden tools is by using a rust removal product. Products like Jenolite or Evapo-Rust are specifically designed to dissolve rust and restore the metal’s surface. Follow the instructions provided by the product to ensure safe and effective rust removal.
If you prefer a DIY approach, you can also use household items like vinegar or lemon juice to remove rust. Soak the rusty part of the tool in the vinegar or lemon juice for a few hours, then scrub away the rust with a wire brush or steel wool. Remember to wear protective gloves when handling these solutions.
After removing the rust, it’s important to thoroughly clean and dry the tools to prevent future rusting. Wipe the tools clean with a damp cloth, removing any residue from the rust removal product or vinegar. Dry the tools completely before storing them to avoid moisture-related damage.
Benefits of Removing Rust:
- Prevents corrosion and extends the lifespan of your garden tools
- Ensures optimal performance and effectiveness when using the tools
- Improves the overall appearance of your tools, making them look well-maintained
- Reduces the risk of rust transferring onto plants and affecting their health
Frequent rust removal is an essential part of garden tool maintenance. By regularly removing rust and keeping your tools clean and dry, you can prevent corrosion and ensure that your tools stay in excellent condition for years to come.
| Rust Removal Products | DIY Rust Removal |
|---|---|
| Jenolite | Vinegar |
| Evapo-Rust | Lemon Juice |
Sanding Wooden Handles
If your garden tools have wooden handles, it’s important to take care of them to prevent splinters and ensure a comfortable grip. Sanding down the wooden handles not only removes rough patches but also extends their lifespan. By following these steps, you can keep your wooden-handled garden tools in excellent condition:
Step 1: Gather the necessary materials
To start sanding your wooden handles, you’ll need a few supplies:
- Coarse-grit sandpaper
- Medium-grit sandpaper
- Fine-grit sandpaper
Step 2: Prepare the handles
Before sanding, make sure the handles are clean and free from any dirt or debris. Use a damp cloth to wipe away any loose dirt and allow the handles to dry completely.
Step 3: Start sanding
Begin sanding the wooden handles using the coarse-grit sandpaper. Apply even pressure and work in the direction of the grain to avoid damaging the wood. Once you have removed any rough patches, switch to the medium-grit sandpaper to smooth out the surface further. Finally, use the fine-grit sandpaper for a final pass to achieve a smooth finish.
Step 4: Apply a protective finish
After sanding, it’s recommended to apply a protective finish to the wooden handles. This can help prevent moisture absorption and enhance the durability of the wood. You can use a wood oil or varnish specifically designed for outdoor use. Follow the manufacturer’s instructions for the best application method and drying time.
By regularly sanding down your wooden handles, you can prevent splinters and maintain a comfortable grip while using your garden tools. This simple maintenance task will ensure that your tools are both functional and safe to use.

Sharpening Blades
Proper maintenance of your garden tool blades is essential for optimal performance and efficiency. Regular sharpening ensures that your tools can effortlessly cut through tough vegetation, making your gardening tasks easier and more enjoyable.
To sharpen your garden tool blades, you can use either a flat file or a handheld sharpener. Begin by securing the tool in a vise or using a clamp to hold it steady. This will provide stability and prevent accidents while sharpening.
“Regular sharpening ensures that your tools can effortlessly cut through tough vegetation, making your gardening tasks easier and more enjoyable.”
Next, follow the existing bevel angle of the blade and use the file or sharpener to make smooth, consistent strokes along the cutting edge. Take care to maintain the original angle and avoid excessive pressure, as this can cause damage to the blade.
After sharpening, carefully remove any metal filings or debris from the blade. A quick wipe with a clean cloth or brush will help ensure that your blades are free from any residue that could affect their performance.
Remember to follow the manufacturer’s instructions for your specific tool, as different models may require different sharpening techniques. By regularly sharpening your garden tool blades, you can maximize their effectiveness and keep them in top condition for years to come.
Table: Recommended Sharpening Angles for Garden Tool Blades
| Tool | Recommended Sharpening Angle |
|---|---|
| Pruning Shears | 20-25 degrees |
| Lawn Mower Blades | 30-45 degrees |
| Hedge Trimmers | 30-35 degrees |
| Shovels and Spades | 45 degrees |

Sources:
– Gardening Success Blog: https://www.gardeningsuccess.com/sharpen-your-tools
– The Handyman’s Guide to Sharpening Tools: Published by GardenCrafters
Lubricating Your Garden Tools to Prevent Rust
Properly lubricating your garden tools is an essential step in preventing rust and ensuring their longevity. By following these best practices, you can protect both the wooden and metal parts of your tools from moisture damage and corrosion.
Why Lubrication is Important
When garden tools are exposed to moisture, whether from rain, dew, or watering, they are susceptible to rust. Rust can weaken the metal and make it difficult to use the tools effectively. Additionally, wooden handles can crack and become damaged without proper lubrication. Lubricating your tools creates a protective barrier that repels moisture and prevents rust from forming.
There are several lubrication options available for garden tools, including boiled linseed oil and mineral oil. These oils penetrate the wood and metal, replenishing moisture and providing a layer of protection. To lubricate your tools, follow these steps:
- First, clean your tools to remove any dirt or debris.
- Apply a thin layer of oil to the wooden handles, making sure to cover the entire surface.
- For metal parts, use a soft cloth or brush to apply the oil, ensuring all areas are coated.
- Let the oil penetrate for a few hours or overnight.
- Wipe off any excess oil with a clean cloth.
Lubricating your garden tools regularly, especially before storing them for the winter, will help keep them in excellent condition and ready for use when spring arrives.

| Benefits of Lubricating Garden Tools | Tips for Effective Lubrication |
|---|---|
|
|
“Proper lubrication is key to preserving the quality and functionality of your garden tools. By taking the time to lubricate them, you’ll save yourself the hassle of dealing with rusty, damaged tools in the future.”
Sterilizing Garden Tools
Proper sterilization of your garden tools is essential for maintaining garden health and preventing the spread of diseases. By taking the time to sterilize your tools, you can ensure that harmful bacteria, fungi, and other pathogens are effectively eliminated, safeguarding the well-being of your plants.
There are various methods you can use to sterilize your garden tools, depending on your preferences and the tools you are working with. One common approach is to use a solution of household bleach and water. Mix one part bleach with nine parts water in a bucket or container, and soak your tools in the solution for about 10 minutes. This will effectively kill any harmful microorganisms present on the surface of the tools.
Another method is to use rubbing alcohol or hydrogen peroxide. Simply moisten a clean cloth or paper towel with the alcohol or peroxide and wipe down the surfaces of your tools. This will help disinfect them and minimize the risk of disease transmission. Alternatively, you can also use a commercial garden tool sanitizer, following the instructions provided by the manufacturer.
Remember to also sterilize any pruning shears or cutting tools after each use, especially when working with diseased plants. This will prevent the spread of plant pathogens from one plant to another. By incorporating regular sterilization practices into your gardening routine, you can maintain a healthy garden environment and promote the overall well-being of your plants.

Table: Comparing Different Sterilization Methods
| Sterilization Method | Pros | Cons |
|---|---|---|
| Bleach Solution | – Effective in killing a wide range of microorganisms | – May cause corrosion on metal tools if not rinsed properly |
| Rubbing Alcohol or Hydrogen Peroxide | – Quick and easy to use | – May be less effective against certain pathogens |
| Commercial Garden Tool Sanitizer | – Specifically designed for garden tools | – Can be more expensive than other methods |
Dry Storage: Preventing Rust and Moisture Damage
Proper storage is essential for preventing rust and moisture damage to your garden tools. By following these best practices, you can ensure that your tools stay in top condition and ready for use when you need them.
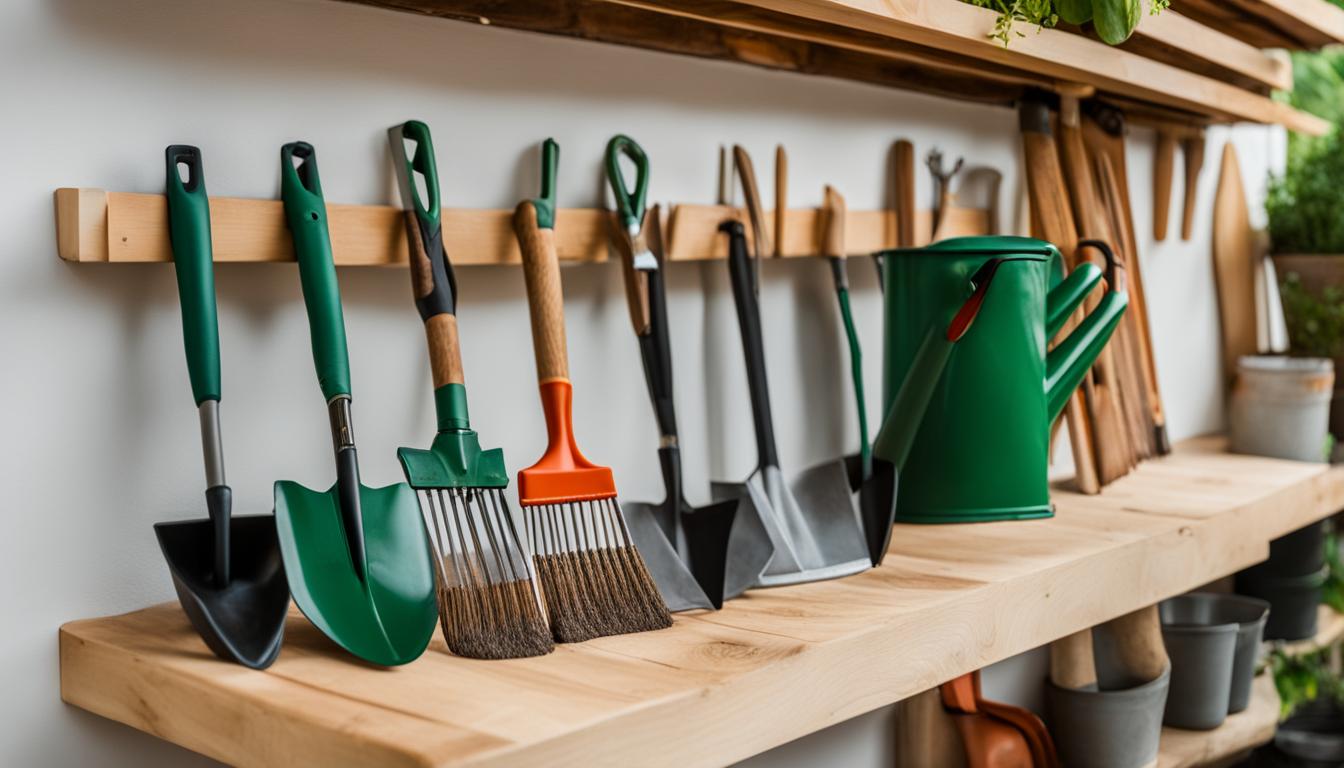
Hang Your Tools on Hooks
One effective way to prevent rust and moisture damage is by hanging your garden tools on hooks. This keeps them off the ground, reducing the risk of moisture accumulation. Hanging your tools also allows for proper air circulation, helping to keep them dry and in good condition.
Choose a Dry Storage Location
When it comes to storing your garden tools, finding a dry location is key. Avoid places that are prone to moisture, such as basements or damp sheds. Instead, consider storing your tools in a garage or a dedicated tool shed that is well-ventilated and protected from the elements.
For added protection, you can place moisture-absorbing materials, such as silica gel packets or chalk, near your tools to help absorb any excess moisture in the air. This can further reduce the risk of rust formation and keep your gardening tools in optimal condition.
| Garden Tool Storage: Do’s and Don’ts |
|---|
| Do: Hang your tools on hooks to keep them off the ground and allow for proper air circulation. |
| Don’t: Rest your tools directly on the floor where moisture can accumulate. |
| Do: Choose a dry storage location, such as a well-ventilated garage or dedicated tool shed. |
| Don’t: Store your tools in basements or damp sheds where moisture is more likely to be present. |
| Do: Use moisture-absorbing materials, such as silica gel packets, to further prevent moisture damage. |
By implementing these storage practices, you can protect your garden tools from rust and moisture damage, ensuring they remain in excellent condition for years to come. With a dry storage location and proper hanging techniques, you can keep your tools rust-free and ready for your next gardening project.
Protecting Garden Tools from Moisture
When it comes to maintaining the longevity of your beloved garden tools, protecting them from moisture is crucial in preventing rust and damage. Moisture exposure can lead to corrosion, which can weaken the tools and render them ineffective. To ensure that your tools stay dry and rust-free, follow these simple yet effective tips:
Proper Cleaning and Drying
After each use, make sure to clean your garden tools thoroughly. Remove any dirt, debris, or plant residue that may have accumulated on the surfaces. This not only helps prevent rust, but also keeps your tools in good working condition. Once cleaned, ensure that the tools are completely dry before storing them.
Moisture can be trapped in the nooks and crannies of the tools, leading to rust formation. As such, it’s important to dry them thoroughly. Wipe them down with a clean cloth or towel, paying special attention to crevices and hard-to-reach areas. You can also use compressed air to blow out any excess moisture.
Storing in a Dry Environment
Choosing the right storage location for your garden tools is crucial in preventing moisture exposure. Avoid leaving them outside where they can be subjected to rain, wet grass, or morning dew. Instead, store them in a dry and well-ventilated area such as a shed, garage, or dedicated tool storage unit.
For an added layer of protection, consider using a dehumidifier or moisture-absorbing products in your storage space. These will help reduce humidity levels and minimize the risk of moisture damage. Additionally, using hanging hooks or racks to store your tools can keep them off the ground, further preventing moisture accumulation.
Regular Inspections and Maintenance
To ensure that your garden tools stay dry and rust-free, it’s essential to perform regular inspections and maintenance. Check for any signs of moisture damage or rust formation during your routine tool cleaning. If you spot any issues, take prompt action to address them.
Apply a thin layer of protective oil, such as WD-40 or a specialized tool oil, to the metal parts of your tools. This acts as a barrier against moisture and helps prevent rust from forming. For wooden handles, consider applying a coat of protective sealant or wax to keep them from absorbing moisture.
By implementing these preventative measures, you can protect your garden tools from moisture and ensure their longevity. Remember, a little extra care can go a long way in keeping your tools in top shape for years to come.

Conclusion
In conclusion, proper storage and maintenance of your garden tools is essential to prevent rust and ensure their longevity. By following the best practices outlined in this article, you can keep your tools in excellent condition throughout the winter season and beyond.
Remember to clean and dry your garden tools after each use, removing any dirt or debris that can lead to rust formation. If rust does occur, use a rust removal product to restore your tools to their original condition. Additionally, sanding wooden handles, sharpening blades, and seasoning with oil will further protect your tools from damage.
When storing your garden tools, make sure to keep them in a dry place and avoid moisture exposure. Hanging your tools on hooks will not only prevent rust but also promote proper air circulation. Lastly, sterilize your tools regularly to prevent the spread of bacteria and diseases among your plants.
By implementing these practices, you can ensure that your garden tools stay rust-free, ready for use, and in optimal condition for all your future gardening projects.
FAQ
Why is it important to clean and dry garden tools?
Cleaning and drying garden tools after each use helps prevent rust from forming and extends their lifespan. Moisture on the tools can cause rust and damage over time.
How can I remove rust from garden tools?
You can remove rust from garden tools by using a rust removal product, such as Jenolite or Evapo-Rust. Follow the instructions provided by the product for effective rust removal.
Why should I sand down the wooden handles of my garden tools?
Sanding down wooden handles removes splinters and rough patches, ensuring a smooth and comfortable grip. This helps prevent injuries while using the tools.
How often should I sharpen garden tool blades?
Garden tool blades should be regularly sharpened to maintain optimal cutting performance. Use a flat file or handheld sharpener to sharpen the blades at the same angle for best results.
How can I season my garden tools with oil?
Seasoning garden tools with oil helps prevent rust and cracking. Apply a thin layer of boiled linseed oil or mineral oil to both the wooden and metal parts of the tools for lubrication and protection.
Why is it important to sterilize garden tools?
Sterilizing garden tools helps prevent the transfer of bacteria and diseases to your plants. Soak the tools in a sterilizing solution for the recommended time to eliminate any harmful microbes.
Where should I store my garden tools?
It is best to store garden tools in a dry place to prevent rust and moisture damage. Hang them on hooks to keep them off the ground and allow for proper air circulation. Avoid resting them directly on the floor where moisture can accumulate.
How can I protect garden tools from moisture?
To protect garden tools from moisture, avoid leaving them outside where they can be exposed to rain, wet grass, and dew. Properly clean, dry, and store your tools to minimize the chances of rust forming.
Why are these best practices important for storing garden tools?
These best practices for storing garden tools are important to prevent rust, extend their lifespan, and ensure they are ready for use when the gardening season starts again. Proper cleaning, drying, rust removal, and maintenance are essential for keeping your tools in excellent condition.


